How To Program - Technical Information
| Home page |
| What is Uberbot |
| What is Ubercode |
| Free trial |
| Ubercode store |
| Testimonials |
| Tech support |
| Forum |
| Links |
| News blog |
1. What information is there for learning how to program Ubercode?A copy of the Learning to Program manual is available for download as a PDF file (requires the Adobe Acrobat reader). Please contact Ubercode Software for other document formats. 2. What are the Technical Specifications of Ubercode?Developer Environment
Control Flow
File Types
Data Types
Visual Object Types
Window Types
Package Contents
System Requirements
3. Is there a Language Report available for Ubercode?Yes. Whenever a new language is designed, a Language Report is normally made available with full details of the new language. The Ubercode Language Report is available for download as a PDF file (requires the Adobe Acrobat reader). Please contact Ubercode Software for other document formats. 4. Is there a list of commands available in Ubercode?Yes. The list of run time language commands (such as Load, Show, Drawtext, Unload and many others) is in the online help. From the Ubercode Developer Environment, choose Help - Index from the menu, type in Alphabetic command reference and click OK. This shows a complete list, and by clicking the links you can see detailed help and example code for each command. If you have the printed Language Reference Manual, this list is in the 'Command Reference' chapter. The language statements (such as if, while etc) are also in the online help. From the Ubercode Developer Environment, choose Help - Index from the menu, type in Program statements and click OK. This shows the list of statements, and by clicking the links you can read about each statement in more detail. This list is also in the printed copy of the Language Reference Manual, in the chapter titled 'Program Statements' (and the following pages). 5. How to create short-cuts (link files)OverviewThese notes describe how to use the Windows API (Application Programming Interface) and COM (Component Object Model) library to create short-cut files (link files). These files have the extension lnk and are used for linking to EXE files, document files and other types of file. They contain the name of the target file, the current directory to use when the target file is run, arguments passed to the target file on the command line, and other information. Short-cuts have many uses:
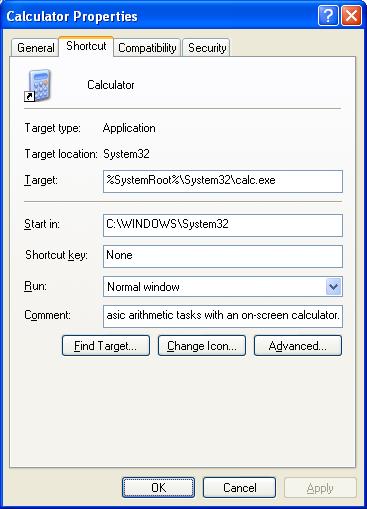
Short-cut files are small binary files of (very) approximately 1000 bytes in size. They are stored using a Microsoft proprietary binary format, and are created and modified using Windows API COM (Component Object Model) functions. The remainder of this topic describes the fields in the short-cut, how to create a short-cut, and a sample program that creates short-cuts. Because this is a Windows API article, this topic concludes by discussing how to create short-cuts in other languages that don't offer direct COM support. Short-cut creation is discussed using Visual Basic and Ubercode - these discussions are relevant because they show that COM and the Windows API are truly language-independent concepts. Internal structure of a short-cutIt's easy to understand a short-cut by viewing its properties from Windows Explorer. Use Windows Explorer to find a short-cut file (eg by searching for files with the extension lnk), click the right mouse button on the short-cut file, choose Properties from the menu, then click on Shortcut in the Properties dialog. The short-cut properties look like this (the exact details vary with different versions of Windows):
The short-cut dialog shows the most important fields, but bear in mind short-cuts have extra fields that are not shown in the dialog. Here is the complete list of fields:
Most of the fields in this list can be set by code when the short-cut file is created. This is shown next. Code to create the short-cutShort-cuts are created using the Windows COM (Component Object Model) library. Functions in the COM library are available to programs written in C, C++, VB script, Javascript and other languages. The sample code here is written in C and is based on an MSDN article and sample code from www.metathink.com. The short-cut is created using the following steps:
The most important steps are 2, 3 and 4 above. These are shown in the CreateShortCut() function shown next:
  /*
  --------------------------------------------------------------------------------
  Description:
    Creates the actual 'lnk' file (assumes COM has been initialized).

  Parameters:
    pszTargetfile    - File name of the link's target.
    pszTargetargs    - Command line arguments passed to link's target.
    pszLinkfile      - File name of the actual link file being created.
    pszDescription   - Description of the linked item.
    iShowmode        - ShowWindow() constant for the link's target.
    pszCurdir        - Working directory of the active link.
    pszIconfile      - File name of the icon file used for the link.
    iIconindex       - Index of the icon in the icon file.

  Returns:
    HRESULT value >= 0 for success, < 0 for failure.
  --------------------------------------------------------------------------------
  */
  static HRESULT CreateShortCut(LPSTR pszTargetfile, LPSTR pszTargetargs,
                                LPSTR pszLinkfile, LPSTR pszDescription,
                                int iShowmode, LPSTR pszCurdir,
                                LPSTR pszIconfile, int iIconindex)
  {
    HRESULT       hRes;                  /* Returned COM result code */
    IShellLink*   pShellLink;            /* IShellLink object pointer */
    IPersistFile* pPersistFile;          /* IPersistFile object pointer */
    WORD          wszLinkfile[MAX_PATH]; /* pszLinkfile as Unicode string */
    int           iWideCharsWritten;     /* Number of wide characters written */

    hRes = E_INVALIDARG;
    if (
         (pszTargetfile != NULL) && (strlen(pszTargetfile) > 0) &&
         (pszTargetargs != NULL) &&
         (pszLinkfile != NULL) && (strlen(pszLinkfile) > 0) &&
         (pszDescription != NULL) &&
         (iShowmode >= 0) &&
         (pszCurdir != NULL) &&
         (pszIconfile != NULL) &&
         (iIconindex >= 0)
       )
    {
      hRes = CoCreateInstance(
        &CLSID_ShellLink,     /* pre-defined CLSID of the IShellLink object */
        NULL,                 /* pointer to parent interface if part of aggregate */
        CLSCTX_INPROC_SERVER, /* caller and called code are in same process */
        &IID_IShellLink,      /* pre-defined interface of the IShellLink object */
        &pShellLink);         /* Returns a pointer to the IShellLink object */
      if (SUCCEEDED(hRes))
      {
        /* Set the fields in the IShellLink object */
        hRes = pShellLink->lpVtbl->SetPath(pShellLink, pszTargetfile);
        hRes = pShellLink->lpVtbl->SetArguments(pShellLink, pszTargetargs);
        if (strlen(pszDescription) > 0)
        {
          hRes = pShellLink->lpVtbl->SetDescription(pShellLink, pszDescription);
        }
        if (iShowmode > 0)
        {
          hRes = pShellLink->lpVtbl->SetShowCmd(pShellLink, iShowmode);
        }
        if (strlen(pszCurdir) > 0)
        {
          hRes = pShellLink->lpVtbl->SetWorkingDirectory(pShellLink, pszCurdir);
        }
        if (strlen(pszIconfile) > 0 && iIconindex >= 0)
        {
          hRes = pShellLink->lpVtbl->SetIconLocation(pShellLink,
                                                     pszIconfile, iIconindex);
        }

        /* Use the IPersistFile object to save the shell link */
        hRes = pShellLink->lpVtbl->QueryInterface(
          pShellLink,        /* existing IShellLink object */
          &IID_IPersistFile, /* pre-defined interface of the IPersistFile object */
          &pPersistFile);    /* returns a pointer to the IPersistFile object */
        if (SUCCEEDED(hRes))
        {
          iWideCharsWritten = MultiByteToWideChar(CP_ACP, 0, pszLinkfile, -1,
                                                  wszLinkfile, MAX_PATH);
          hRes = pPersistFile->lpVtbl->Save(pPersistFile, wszLinkfile, TRUE);
          pPersistFile->lpVtbl->Release(pPersistFile);
        }
        pShellLink->lpVtbl->Release(pShellLink);
      }

    }
    return (hRes);
  }
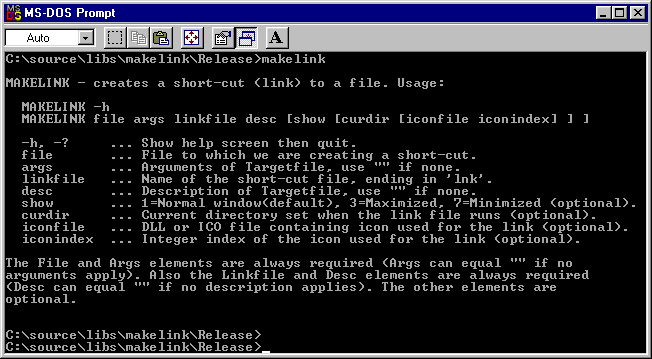
The code works as follows. Firstly the inputs are validated, to avoid program errors caused by NULL pointers or missing arguments. Assuming the inputs are valid, CoCreateInstance() is called to create the IShellLink object. If IShellLink was successfully created, the fields in the short-cut can be set. This is done by SetPath(), SetArguments(), SetDescription(), SetShowCmd(), SetWorkingDirectory(), and SetIconLocation(). Some of these fields are optional, for example if no description was passed into the function, SetDescription() is not called. After setting the fields, the short-cut exists only in memory. The next step is to use QueryInterface() to create the IPersistFile object. The call to QueryInterface() (instead of CoCreateInstance()) connects IPersistFile to the IShellLink object. This means IPersistFile knows what to save when it is told to write to a file. After IPersistFile was created, the name of the short-cut file (pszLinkfile) is converted to a Unicode string. Then IPersistFile's Save() method is called, which saves the short-cut to an actual file. The end result is the short-cut now exists as a lnk file on disk. Before the function returns, both objects are tidied up by calling their Release() functions. This frees any memory used and closes any files. The function return the HRESULT value produced by the COM functions - this is a positive integer value or zero indicating success, or a negative value if the functions failed. HRESULT values can be tested with the SUCCEEDED macro. Sample programThis topic also includes a sample program for creating short-cuts, provided as C source code. The file has no external dependencies other than the Windows API, so it can be compiled by creating a new console-mode project, adding the source file and compiling it. The compiled program makelink.exe should run under any version of Windows, from Windows 95 onwards. When the sample program is run without any parameters, it shows a help screen as follows:
The help screen shows how the program is called up. For example if you type: makelink c:\windows\notepad.exe "" mylink.lnk "" this creates a short-cut file mylink.lnk in the current directory. The empty strings "" represent the arguments and description which are not required. When mylink.lnk is double-clicked, it runs the Notepad program. As another example if you type: makelink c:\windows\write.exe c:\windows\tips.txt mylink.lnk "" this creates a short-cut file mylink.lnk in the current directory. When activated, the short-cut will run the Windows write.exe program and make it open the Windows tips file. If you read through the source code of the sample program, you will see the following functions: ShowHelp() - shows the command line arguments. ShowError() - this is called if an error occurrs. It prints the error details to the console window. GetArguments() - this parses the command line arguments passed to the program. CreateShortCut() - function that creates the short-cut file, as shown previously. main() - checks the command line arguments. If -h was used, or if the arguments are invalid, this shows the help page and quits. If the arguments are valid, this calls CreateShortCut() to create the short-cut file. Short-cuts in other languages - UbercodeIt is interesting to see how short-cut are created using other computer languages. The main complication is that not all languages allow direct calls to the COM library. Programs in these languages must either provide link creation code as an inbuilt function in the language, or must use other techniques to access the COM library. For example Ubercode is a modern computer language with ease-of-use as its main objective. Ubercode syntax is as simple as possible, consistent with being useful for real-world applications, and consistent with being compilable to Windows EXE files and allowing simple distribution to other computers. To implement short-cuts, Ubercode includes built-in library functions that directly permit the creation of short-cuts. Here is a sample program:
  Ubercode 1 Class MakeShortCut

  public function main()
  var
    linkfile:string[*]
    result:integer(0:MAXINT)
  code
    linkfile <- "mylink.lnk"
    result <- FileCreateShortcut("c:\windows\notepad.exe", "", linkfile, "")
    if SUCCEEDED(result) then
      call Msgbox("MakeShortCut",
                  "Return code = " + Str(result) + NL +
                  "Successfully created " + linkfile)
    else
      call Sound("")
      call Msgbox("MakeShortCut",
                  "Return code = " + Str(result) + NL +
                  "Could not create " + linkfile)
    end if
  end function

  end class
As can be seen, Ubercode syntax is similar to Javascript and to C#. The program consists of a single class MakeShortCut containing a single function main. The class is therefore a main class that compiles to an EXE file. The code in function main works as follows: First the name of the short-cut file is copied to a string variable, then FileCreateShortcut() is called. This is an inbuilt library function that takes the same argument as the makelink program shown previously (Ubercode allows functions to have optional arguments). After FileCreateShortcut() returns, the result of the call is checked, and a success or failure message is shown. When the program terminates, the short-cut file will exist on disk. If you want to experiment more with this code and with the Ubercode Developer Environment, it can be downloaded from the Ubercode website. Short-cuts in other languages - Visual BasicMost versions of Microsoft Visual Basic provide direct access to the COM library, so short-cuts can be created using Visual Basic. Here is a program that creates a short-cut. This example is loosely based on the Microsoft Windows Script Technologies help file v5.6, under the topic Creating a shortcut. This example has been tested with VBscript v5.6, and should also run under Visual Basic version 5 and version 6:
  ' Make sure variables are declared.
  option explicit

  ' Routine to create "mylink.lnk" on the Windows desktop.
  sub CreateShortCut()
    dim objShell, strDesktopPath, objLink
    set objShell = CreateObject("WScript.Shell")
    strDesktopPath = objShell.SpecialFolders("Desktop")
    set objLink = objShell.CreateShortcut(strDesktopPath & "\mylink.lnk")
    objLink.Arguments = "c:\windows\tips.txt"
    objLink.Description = "Shortcut to Notepad.exe"
    objLink.TargetPath = "c:\windows\notepad.exe"
    objLink.WindowStyle = 1
    objLink.WorkingDirectory = "c:\windows"
    objLink.Save
  end sub

  ' Program starts running here.
  call CreateShortCut()
This works as follows. The program starts running at the first line of module-level code (ie code not in a function or subroutine), which is the line of code call CreateShortCut(). The CreateShortCut() routine declares its variables, then creates the COM object objShell using "WScript.Shell". The string variable strDesktopPath is initialized with the full path to the Windows desktop. The call objShell.CreateShortcut creates an actual IShellLink object which is stored in the objLink variable. The fields of objLink are set, and these fields have the same meanings and values as in the short-cut properties dialog shown previously. Refer to the section Internal structure of a short-cut for more details of the fields. After setting the fields, objLink.Save uses the IPersistFile object to save the short-cut file to disk. Visual Basic automatically cleans up COM objects, so it is not necessary to call the Release method for the objects before the subroutine returns. To run the example, save the code to a file with the extension vbs, for example makelink.vbs. Open a command window and type wscript makelink.vbs to run it. After the Visual Basic file finishes running, the short-cut mylink.lnk should exist on the Windows desktop. If double-clicked, the short-cut will run Windows Notepad, and open the Windows tips file. ConclusionThis article discussed the uses of short-cuts and their internal structure. It showed a C function for creating a short-cut and provided C source code for a command-line program that creates short-cuts. The article then discussed short-cut creation using other languages. The purpose of the discussion was to show COM functions are available in the same way as other Windows API functions - there is nothing special about COM that requires it to be called from C++ or from Microsoft scripting languages. I hope you enjoyed the article. Any suggestions or feedback is welcome. |