1. How do I write a basic program with a window?
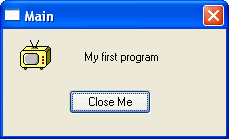
This example tells you how to write a Microsoft Windows program that looks like this:
This is an easy way of learning to program windows in a few simple steps. The new program
consists of two parts, the code (commands of the program), and the window (or dialog)
that will appear on the screen.
(i) Write the code
This is the first step, and can be done automatically. Start the Ubercode Developer Environment,
click Close in the startup wizard, then choose File - New - Program from the main
menu. Click OK to accept the defaults, or choose a different directory and name if you want. Leave
the program type as "1-Main Window".
After clicking OK, the new program and its dialog are created, and the code window,
dialog editor and program window automatically open. The code processes events in the
dialog when it runs, the dialog editor defines the layout of the dialog, and the program window
shows all the files used in the program. If you look at the code window, you'll notice a function
called Main - this function processes all the events from the dialog of the same name.
(ii) Add code for the Pushbutton
We need some code to make the Pushbutton unload the dialog. This is because the pushbutton is
intended to end the program. Click the code window to activate it, and find the line of code that
says:
case COMMAND_EVENT =>
Change it to read:
  case COMMAND_EVENT =>
       if ControlObj = Me.Pushbutton1 then
         call Unload(Me)
       end if
This code says that whenever Pushbutton1 is pressed, the dialog is unloaded (closed).
(iii) Add the Label Object
Now add the control objects to the dialog. In the toolbox, click the Label button, shown with
the red arrow in the diagram:

This drops a Label object onto the dialog. After dropping the label, drag it to the centre and
right-click it with the mouse to bring up the Label properties:
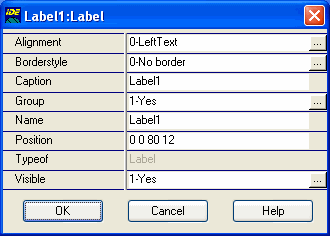
Change the Caption property to a short message, for example type in My first program.
After typing the text, click OK to close the Label Properties.
(iv) Add the Pushbutton Object
Now the Pushbutton object must be added. In the toolbox, click the Pushbutton object button
(located directly below the Label object button). This drops the pushbutton on the dialog. Drag it
near the bottom of the dialog, then right-click to bring up the Pushbutton properties:
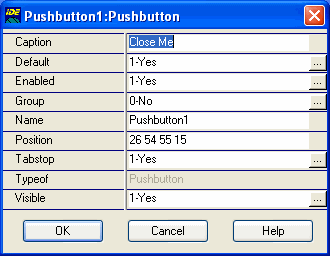
Change the Caption property to Close Me and the Default property to 1 (both shown
above). Then click OK to close the Pushbutton properties.
(v) Add the Icon Object
Also you can add an Icon object. In the toolbox, click the Icon object button, located to the
left of the Label. This drops the Icon onto the dialog. Drag it where you want, then right- click
the object to set the Icon properties. In the Icon properties, you can choose the picture. It must
be an icon file. Click the small button next to the Picture entry field, and browse until you find
an interesting icon. There are hundreds of icons in the \Program files \Ubercode \icons
directory. Click OK after choosing the icon.
If you wanted to modify the properties of the dialog itself, right- click anywhere on the dialog
background (except on a control object). This brings up the dialog properties, which include such
things as the dialog caption, whether the dialog is resizable, and the dialog name etc. If you do
this, don't change the name from main since the name must match the code.
After using the property editors, you've designed a dialog called Main with several control
objects. Just to recap:
- In this example, the dialog is called main and the code contains a function called
main. Function main processes button clicks and other events from the dialog.
- Function main detects the COMMAND_EVENT (triggered whenever a Pushbutton is pressed) and
uses it to unload the dialog.
- Each dialog always has a function of the same name. Although this example only has one dialog,
programs are allowed any number of dialogs. Each dialog must have its own function.
- The name main is special, and it means the function and its window are called first when
the program starts running. All programs must have a function called main, which is where
the program starts.
(vi) Compile the program
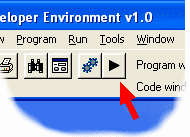
Click the Run button (shown below with the arrow) and wait a few moments. This compiles the
program to an EXE file and runs it:
When the program runs, you will see the dialog on the screen. It looks like this:
That's it! You have successfully written a Windows program that could run under any version of
Windows. The window above is part of the EXE file, and it can outside the Developer Environment if
wanted. Press the "Close me" button to end the program. The Close button triggers the Command
event, which unloads the dialog. The program will then end because it has no windows left.
2. What are dialogs, forms, modal and modeless windows?
Dialogs, dialog boxes, forms and entry windows all mean the same
thing. They refer to a rectangular window that displays text and graphics and usually has push
buttons and other controls. For example:

The reason for the different names is historical. C/C++ programmers refer to them as
dialogs, the Windows documentation uses dialog box and Visual Basic (for reasons only
known to Microsoft) uses form.
When you're learning Windows programming, you can use the word dialog instead of
form, or vice versa. Internally to the Windows operating system, they are the same - they
are all WND structures referenced by a HWND.
A modal dialog (or window or dialog box or form) refers to a dialog that
locks out all other dialogs in the same program. The other dialogs can only be used when the modal
dialog is hidden or closed. Modal dialogs are used when a program requires some information or
requires to finish a task before continuing.
A modeless dialog (or window or dialog box or form) refers to a dialog that
does not lock out other dialogs. This is important when multiple dialogs are shown by a
program. If the dialogs are modeless, you can switch between them by clicking them with the mouse.
This is useful when dialogs are used for independent pieces of information.
Modal and modeless dialogs only take effect within a single program. A modal dialog has no
effect whatsoever on dialogs in a different program.
3. How do I create a dialog?
This explains how to write a program that shows a single dialog. The dialog may have one or more
control objects in it (it's up to you when you create the dialog). This example uses the following
steps:
- Start the Developer Environment by double clicking its icon.
- Choose the File - New - Program command from the menu. A properties dialog will appear
that allows you to choose the program details.
- Check the program is being created in the directory you want. You can type in a different
directory or press the small button next to the entry field. Press OK when you've selected the
directory.
- Several new windows will appear. There is a dialog editor (covered with a grid), a
code editor containing some text, and a program window which shows all the files in
the program.
- Click on the dialog editor to activate it.
- Add some control objects by pressing the buttons on the Toolbox. To change the properties of an
object, right-click it with the mouse to bring up the properties dialog. After changing the
properties, click OK to close the Properties window and save the changes.
- You may want to look at the code that processes the events in the dialog. Double-click the
dialog editor background (not on a control) to locate the function that handles the window events.
Note the function name "Main" is the same as the dialog name. In this example, we don't need any
special processing for the window. Therefore the automatically generated code is OK and you don't
have to change it.
- Now you have to run the program. Click the Run button which saves, compiles and runs the
program. Wait a few moments, then the dialog you designed will appear on the screen. Now it's
running as a real Windows program.
4. How do I create a modeless dialog?
This explains how to write a program with two modeless dialogs. Dialogs are modeless when it is
possible to switch between them by clicking them with the mouse. Modeless dialogs are useful when
you want to carry out tasks in different dialogs that do not interfere with each other. This
example uses the following steps:
- Start the Developer Environment by double clicking its icon.
- Create two dialogs and their event functions. The easiest way is by pasting the following code
into the Developer Environment:
  // Wnd2.rc
  #define Label1      101
  #define Pushbutton1 102

  Window1 DIALOG 100,100,185,80
  CAPTION "First Modeless Window"
  FONT 8,"Microsoft Sans Serif"
  STYLE WS_POPUP|WS_CAPTION|WS_SYSMENU|DS_MODALFRAME
  BEGIN
    LTEXT          "Some text in the first modeless window",
                   Label1,17,17,135,16,SS_LEFT
    DEFPUSHBUTTON  "Close",Pushbutton1,64,49,60,16
  END

  Window2 DIALOG 140,120,185,80
  CAPTION "Second Modeless Window"
  FONT 8,"Microsoft Sans Serif"
  STYLE WS_POPUP|WS_CAPTION|WS_SYSMENU|DS_MODALFRAME
  BEGIN
    LTEXT          "Some text in the second modeless window",
                   Label1,17,17,135,16,SS_LEFT
    DEFPUSHBUTTON  "Close",Pushbutton1,64,49,60,16
  END

  // Wnd2.cls
  Ubercode 1 Class Wnd2

  callback function Window1(in  EventId:integer
                                ControlObj:control
                                Key:integer
                            out Cancel:boolean)
  code
    select EventId
    case COMMAND_EVENT =>
         if ControlObj = Me.Pushbutton1 then
           call Unload(Me)
         end if
    end select
  end function

  callback function Window2(in  EventId:integer
                                ControlObj:control
                                Key:integer
                            out Cancel:boolean)
  code
    select EventId
    case COMMAND_EVENT =>
         if ControlObj = Me.Pushbutton1 then
           call Unload(Me)
         end if
    end select
  end function

  public function main()
  code
    call Show(Window1, 0)
    call Show(Window2, 0)
  end function

  end class
- To paste the code, first select it in the browser window using the mouse. Make sure you've
selected all the code, without selecting any of the text nearby. It should turn a nice dark blue
color after being selected.
- Copy the code to the Windows clipboard (Ctrl+C).
- Go back to the Developer Environment, and paste the clipboard text (Ctrl+V). Save it as a "New
Program".
- Press OK to confirm the file names in the "Save" dialogs.
- Click the Run button which compiles and runs the program. Wait a few moments, then you should
see both dialogs appear. The dialogs are modeless therefore you can click on either one.
- Close both the dialogs to finish the program.
5. How do I create a modal dialog?
This explains how to write a program with a modal dialog. A modal dialog blocks out all other
dialogs in the same program until it is closed or hidden. Modal dialogs are useful when a program
requires information before continuing. For example the File - Open command as used in most
programs is modal, because a file name is required before continuing.
This example shows two modeless dialogs, then a third dialog which is modal. The modal dialog
blocks out the modeless dialogs. After closing the modal dialog, the modeless dialogs can be used.
This example uses the following steps:
- Start the Developer Environment by double clicking its icon.
- Create three dialogs and their event functions. The easiest way is by pasting the following
code into the Developer Environment:
  // Wnd3.rc
  #define Label1      101
  #define Pushbutton1 102

  Window1 DIALOG 100,100,185,80
  CAPTION "First Modeless Window"
  FONT 8,"Microsoft Sans Serif"
  STYLE WS_POPUP|WS_CAPTION|WS_SYSMENU|DS_MODALFRAME
  BEGIN
    LTEXT          "Some text in the first modeless window",
                   Label1,17,17,135,16,SS_LEFT
    DEFPUSHBUTTON  "Close",Pushbutton1,64,49,60,16
  END

  Window2 DIALOG 140,120,185,80
  CAPTION "Second Modeless Window"
  FONT 8,"Microsoft Sans Serif"
  STYLE WS_POPUP|WS_CAPTION|WS_SYSMENU|DS_MODALFRAME
  BEGIN
    LTEXT          "Some text in the second modeless window",
                   Label1,17,17,135,16,SS_LEFT
    DEFPUSHBUTTON  "Close",Pushbutton1,64,49,60,16
  END

  Window3 DIALOG 180,140,185,80
  CAPTION "Modal Window"
  FONT 8,"Microsoft Sans Serif"
  STYLE WS_POPUP|WS_CAPTION|WS_SYSMENU|DS_MODALFRAME
  BEGIN
    LTEXT          "Some text in the modal window",
                   Label1,17,17,135,16,SS_LEFT
    DEFPUSHBUTTON  "Close",Pushbutton1,64,49,60,16
  END

  // Wnd3.cls
  Ubercode 1 Class Wnd3

  callback function Window1(in  EventId:integer
                                ControlObj:control
                                Key:integer
                            out Cancel:boolean)
  code
    select EventId
    case COMMAND_EVENT =>
         if ControlObj = Me.Pushbutton1 then
           call Unload(Me)
         end if
    end select
  end function

  callback function Window2(in  EventId:integer
                                ControlObj:control
                                Key:integer
                            out Cancel:boolean)
  code
    select EventId
    case COMMAND_EVENT =>
         if ControlObj = Me.Pushbutton1 then
           call Unload(Me)
         end if
    end select
  end function

  callback function Window3(in  EventId:integer
                                ControlObj:control
                                Key:integer
                            out Cancel:boolean)
  code
    select EventId
    case COMMAND_EVENT =>
         if ControlObj = Me.Pushbutton1 then
           call Unload(Me)
         end if
    end select
  end function

  public function main()
  code
    call Show(Window1, 0)
    call Show(Window2, 0)
    call Show(Window3, 1)
  end function

  end class
- To paste the code, first select it in the browser window using the mouse. Make sure you've
selected all the code, without selecting any of the text nearby. It should turn a nice dark blue
color after being selected.
- Copy the code to the Windows clipboard (Ctrl+C).
- Go back to the Developer Environment, and paste the clipboard text (Ctrl+V). Save it as a "New
Program".
- Press OK to confirm the file names in the "Save" dialogs.
- Take a look at the main class "wnd3.cls". It has window functions for the three dialogs. Each
function responds to the pushbutton that closes the dialog.
- Also, function main has three calls to Show. The first two calls show Window1 and Window2 as
modeless windows, because the value "0" is used. The third call shows Window3 as a modal window,
because the value "1" is used. The third call to Show does not return until the modal window is
closed.
- Now you have to run the program. Click the Run button which compiles and runs the program. Wait
a few moments, then you should see the three dialogs. Only the modal dialog can be used, and the
other two do not accept input.
- Close the modal dialog. It will be unloaded and the modeless dialogs can now be used.
- Close the remaing dialogs to finish the program.
6. How do I set the title (caption) in a window?
Use the Caption property. This can be initially set at design time, and it can be changed
at run time using SetCaption.
7. How do I center a dialog box on the screen?
Use the dialog's Alignment property at design time and set Alignment=Center. You can also
center the dialog at run time by calculating the screen size and the dialog size, and using the
Position property to place the dialog exactly where you want it.
8. How do I make a dialog window store its settings?
This is useful when you have a complex dialog with multiple controls, and you want to keep the
values the next time the program runs. To do this, inherit from the Profstr class, call
LoadInifile under the Load event to load the values, and call SaveInifile under the
Unload event to write back the values. For example:
  // dialog6.rc
  // (needs "smiley2.ico" in the same folder)
  #define Icon1       100
  #define Label1      101
  #define Pushbutton1 102
  #define Edit1       103
  #define Label2      104
  #define Checkbox1   105

  Main_Icon1 ICON "smiley2.ico"

  Main DIALOG 229,155,253,105
  CAPTION "Single dialog"
  FONT 8,"Microsoft Sans Serif"
  STYLE WS_POPUP|WS_CAPTION|WS_SYSMENU|DS_CENTER|DS_MODALFRAME
  BEGIN
      ICON           "Main_Icon1",Icon1,13,9,21,20
      LTEXT          "This program shows a dialog that loads and saves its values.",
                     Label1,45,8,203,12
      LTEXT          "My favorite food:",Label2,45,24,120,12
      EDITTEXT       Edit1,44,40,120,12,ES_AUTOHSCROLL
      CHECKBOX       "Click here if you want",
                     Checkbox1,45,56,120,12,BS_AUTOCHECKBOX|WS_TABSTOP
      DEFPUSHBUTTON  "Close",Pushbutton1,101,81,55,15
  END

  // dialog6.cls
  Ubercode 1 Class dialog6

  uses Profstr

  public callback function main(in  EventId:integer
                                    ControlObj:control
                                    Key:integer
                                out Cancel:boolean)
  code
    select EventId

    case LOAD_EVENT =>
         call Appicon("smiley2.ico")
         call LoadInifile(Dirstart()+"dialog6.cfg", me)

    case COMMAND_EVENT =>
         if ControlObj = me.Pushbutton1 then
           call Unload(me)
         end if

    case UNLOAD_EVENT =>
         call SaveInifile(Dirstart()+"dialog6.cfg", me)
    end select
  end function

  end class
Copy the RC file and the class to the clipboard, go into the IDE and use Edit-Paste (the IDE
will save the files for you). Then run it.
|